Using PS to create the effect of characters being scattered, the entire effect is relatively simple to create. Students can use materials to create and design, or they can use materials of their own choice to create. There are some details that need to be paid attention to, such as the character’s hair. Quickly The selection tool cannot complete the refinement. You need to select and cover the functions. The entire finished product will be more design-like. Let’s learn how to make it according to the tutorial.
Rendering:
 For newbies to learn PS, please go to: www.16xx8.com
Material:
Operation steps:
Open ps, drag the character material into it, and use ctrl+j to copy one layer to get the character. Copy layer:
Hide the character layer as a backup file, and now we start cutting out the image. Use the quick selection tool to get a rough selection of the character. It should be noted that there are still some parts of the character’s hair that are not completed, but the detailed parts cannot be completed using the quick selection tool:

At this time, we select the select and mask function above to refine the cutout:
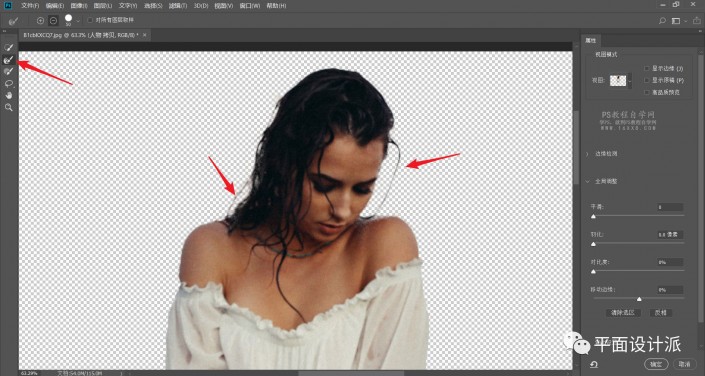
At this point we enter the cutout interface and select the tool on the left. Paint the details of the characters and the system will automatically calculate the required parts for us. This function is the power of the PS2018 version:

After you are satisfied with the selection, use ctrl+j to copy the selection and get layer 1:
Generally, many tutorials ask you to create a new canvas after fastening the character. I think that is too low, and the original beauty of the picture is completely lost, so we will not do it today. I think this background is very good, so I will use it! First temporarily hide layer 1, select the character, copy the layer, hold down the ctrl key and click on the layer thumbnail to create a selection for it, and execute Edit-Fill:
Select Content Identification for content, and keep the rest as default, as shown in the picture:

The power of PS cannot be underestimated. It took only a second or two to remove part of the character, but there are still some parts left that need to be dealt with:
Select the Clone Stamp tool and retouch the image. I won’t go into the specific operations. There is no need to deal with the shadow, and it will not hinder the effect:

Now we work on the characters. Display layer 1 and make a copy to get layer 1. Copy the layer. Select layer one and execute Filter-Liquify:
Select the smear tool and perform the following liquefaction process:

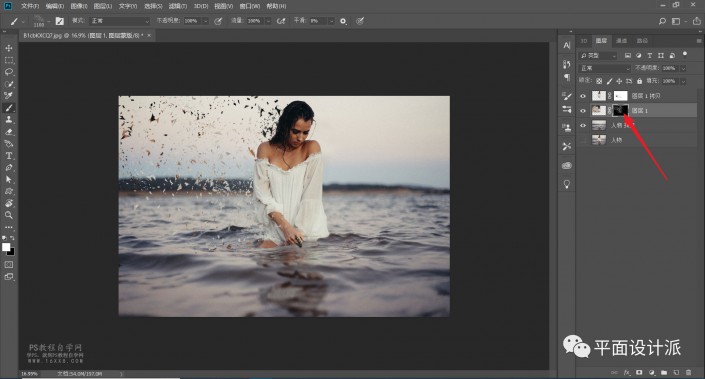
Add a white maskhttp://www.16xx8.com/tags/38847/ to the copy layer of layer 1 above, and hold down the alt key to add layer 1 below.Color mask:
Call up the fragment brush tool, which is already provided in the material package. Of course, you can also download it online. In the second article updated simultaneously today, I have provided a website for free downloads of massive brushes, you can check it out:

Set the brush tip shape. The dynamic parameters of the shape are as follows. You can also try the rest.
Select the black mask, set the foreground color to white, and click to apply to get the effect below. This operation seems simple, but in fact I adjusted the brush size many times to get this effect:

Similarly, select the white mask, set the foreground color to black, and click to apply to get the following effect:
Complete:
 For newbies to learn PS, please go to: www.16xx8.com
It’s easy to follow the tutorials to practice and make. However, you still need to practice it yourself. Let’s learn it together.
Using PS to create the effect of characters being scattered, the entire effect is relatively simple to create. Students can use materials to create and design, or they can use materials of their own choice to create. There are some details that need to be paid attention to, such as the character’s hair. Quickly The selection tool cannot complete the refinement. You need to select and cover the functions. The entire finished product will be more design-like. Let’s learn how to make it according to the tutorial.
Rendering:
 For newbies to learn PS, please go to: www.16xx8.com
Material:
Operation steps:
Open ps, drag the character material into it, and use ctrl+j to copy one layer to get the character. Copy layer:
Hide the character layer as a backup file, and now we start cutting out the image. Use the quick selection tool to get a rough selection of the character. It should be noted that there are still some parts of the character’s hair that are not completed, but the detailed parts cannot be completed using the quick selection tool:

At this time, we select the select and mask function above to refine the cutout:
At this point we enter the cutout interface and select the tool on the left. Paint the details of the characters and the system will automatically calculate the required parts for us. This function is the power of the PS2018 version:

After you are satisfied with the selection, use ctrl+j to copy the selection and get layer 1:
Generally, many tutorials ask you to create a new canvas after fastening the character. I think that is too low, and the original beauty of the picture is completely lost, so we will not do it today. I think this background is very good, so I will use it! First temporarily hide layer 1, select the character, copy the layer, andHold down the ctrl key and click on the layer thumbnail to create a selection for it and perform Edit-Fill:
Select Content Identification for content, and keep the rest as default, as shown in the picture:

The power of PS cannot be underestimated. It took only a second or two to remove part of the character, but there are still some parts left that need to be dealt with:
Select the Clone Stamp tool and retouch the image. I won’t go into the specific operations. There is no need to deal with the shadow, and it will not hinder the effect:

Now we work on the characters. Display layer 1 and make a copy to get layer 1. Copy the layer. Select layer one and execute Filter-Liquify:
Select the smear tool and perform the following liquefaction process:

Add a white Maskhttp://www.16xx8.com/tags/38847/ to the copy layer of Layer 1 above, and add a black mask to Layer 1 below by holding down the alt key:
Call up the fragment brush tool, which is already provided in the material package. Of course, you can also download it online. In the second article updated simultaneously today, I have provided a website for free downloads of massive brushes, you can check it out:

Set the brush tip shape. The dynamic parameters of the shape are as follows. You can also try the rest.
Select the black mask, set the foreground color to white, and click to apply to get the effect below. This operation seems simple, but in fact I adjusted the brush size many times to get this effect:

Similarly, select the white mask, set the foreground color to black, and click to apply to get the following effect:
Complete:
 For newbies to learn PS, please go to: www.16xx8.com
It’s easy to follow the tutorials to practice and make. However, you still need to practice it yourself. Let’s learn it together.

 微信扫一扫打赏
 支付宝扫一扫打赏

