

@野鹿志: This tutorial uses PS to create a character poster with blinds effect. The original character has both characters and background images. We mainly use the selection and layer mask , add some typesetting arrangements later to achieve the effect of the poster. The whole tutorial is not difficult, but the adjustment of the details requires students to devote patience and energy. What are you waiting for? Let’s make this blind-style character poster together.
Rendering:

www.16xx8.com
Operation steps:
Open PS and create a new canvas of any size:

Drag in the background material prepared in advance and adjust it to the appropriate size:

Create a new black and white adjustment layer and convert it to black and white.
Then CTRL+SHIFT+ALT+E to stamp a new layer as a new background:

Then drag the character material in and cut out the picture. There is no need to say more about this step:

There is no need to cut it out very carefully, it will be dealt with later anyway. After cutting out, it will probably look like this:

Just like the background layer, create a new black and white adjustment layer and convert it to black and white, then stamp the new layer out:

Draw a long rectangle above the background layer:

Repeatedly copy multiple rectangles. Needless to say, this step goes without saying:

Then merge these rectangular layers into one layer, which will be used later:

Type the text and layout it. This step is very important. If the layout is not good-looking, the effect will not be good when done later.
You can transform each letter individually to be tangent to the rectangle.
After finishing, merge the letters into one layer:

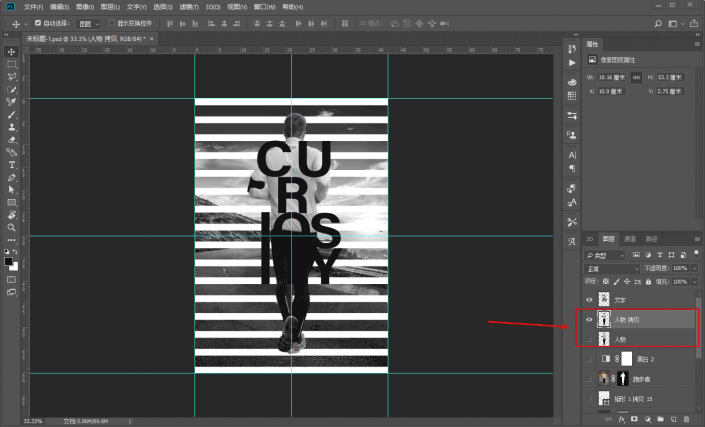
Next is the focus of today. First copy the character layer and hide it for later use:
Hold down the CTRL key and click the character layer thumbnail to load the character’s selection, execute Select-Save Selection, and store it as channel 1:

After hiding the text layer, also hold down the CTRL key and click the selection where the text is loaded.
Execute Select-Save Selection, select the channel 1 just stored, and select the operation as Add to Channel:

Go to the channel panel and load the selected selection:

Go back to the Layers panel and add a layer mask to the character layer, so that part of the text is done:

In the same way, first load the text selection and create it as channel 2, then load the character selection, select from channel 2 as subtract from channel, pay attention to the text first and then the character:

In the channel panel, the selection of the remaining part of the text is ready:

Copy a background layer, first load the selection of the rectangular layer, invert the selection, and add a layer mask to the copied layer:

Then load the selection of channel 2 and add a layer mask to another background layer:

Then adjust the details and erase the unnecessary parts on the corresponding layer. There are no restrictions on the method. You can use a brush or a selection tool.
This step is actually very important, be careful and take your time:

The final coding, typesetting, and prototype guide are completed:
www.16xx8.com
Well~ the structural layout doesn’t feel as good as the original picture, but I think the method should be like this.
To share the video version, please click:
This article is published by “Yelu Zhi”
Please contact Malu Yelang before reprinting
Private transfers will be investigated
Based on the content of the tutorial, students believe that they can make character posters that satisfy them. If they are more careful, they can do better.
@野鹿志: This tutorial uses PS to create a character poster with blinds effect. The original character has both characters and background images. We mainly use the selection and layer mask , add some layout arrangements later to achieve the effect of a poster. The whole tutorial is not difficult, butAdjusting the details requires students to devote their patience and energy. What are you waiting for? Let’s make this shutter-style character poster together.
Rendering:
www.16xx8.com
Operation steps:
Open PS and create a new canvas of any size:
Drag in the background material prepared in advance and adjust it to the appropriate size:
Create a new black and white adjustment layer and convert it to black and white.
Then CTRL+SHIFT+ALT+E to stamp a new layer as a new background:
Then drag the character material in and cut out the picture. There is no need to say more about this step:
There is no need to cut it out very carefully, it will be dealt with later anyway. After cutting out, it will probably look like this:
Just like the background layer, create a new black and white adjustment layer and convert it to black and white, then stamp the new layer out:
Draw a long rectangle above the background layer:
Repeatedly copy multiple rectangles. Needless to say, this step goes without saying:
Then merge these rectangular layers into one layer, which will be used later:
Type the text and layout it. This step is very important. If the layout is not good-looking, the effect will not be good when done later.
You can transform each letter individually to be tangent to the rectangle.
After finishing, merge the letters into one layer:
Next is the focus of today. First copy the character layer and hide it for later use:
Hold down the CTRL key and click the character layer thumbnail to load the character’s selection, execute Select-Save Selection, and store it as channel 1:
After hiding the text layer, also hold down the CTRL key and click the selection where the text is loaded.
Execute Select-Save Selection, select the channel 1 just stored, and select the operation as Add to Channel:
Go to the channel panel and load the selected selection:
Go back to the Layers panel and add a layer mask to the character layer, so that part of the text is done:
In the same way, first load the text selection and create it as channel 2, then load the character selection, select from channel 2 as subtract from channel, pay attention to the text first and then the character:
In the channel panel, the selection of the remaining part of the text is ready:
Copy a background layer, first load the selection of the rectangular layer, invert the selection, and add a layer mask to the copied layer:
Then load the selection of channel 2 and add a layer mask to another background layer:
Then adjust the details and erase the unnecessary parts on the corresponding layer. There are no restrictions on the method. You can use a brush or a selection tool.
This step is actually very important, be careful and take your time:
The final coding, typesetting, and prototype guide are completed:
www.16xx8.com
Well~ the structural layout doesn’t feel as good as the original picture, but I think the method should be like this.
To share the video version, please click:
This article is published by “Yelu Zhi”
Please contact Malu Yelang before reprinting
Private transfers will be investigated
Based on the content of the tutorial, students believe that they can make character posters that satisfy them. If they are more careful, they can do better.
 微信扫一扫打赏
 支付宝扫一扫打赏

