@Manhattan Impression PHOTO:
Hello, everyone, I am Manhattan Impression. I have explained the principles and applications of histograms to you in the last few issues. This time I will bring you a color grading tutorial in the later stage of imitating animation. Some time ago, because of a friend’s I posted a picture that imitates animation. Everyone wants to know how it was post-produced. There is a high demand for it, so I made this tutorial for everyone to learn from.
The general process of this tutorial is as follows:
1: Determine the material
2: Cutout
3: Filter processing + brightness adjustment
4: Replace the sky brightness with uniformity
5: Color adjustment
First the comparison picture:

www.16xx8.com
Find good materials and get twice the result with half the effort
Of course, doing this kind of animation post-production tutorial does not mean just taking a photo. There are also certain criteria for judging. Generally speaking, the style of the original picture must be somewhat similar to the style of the animation.
1
Cutout
The first step is to cut out the image. Because we need to change the sky, we can see that there is a big color difference between the buildings and the sky in the original image. This is still very convenient for us to separate the buildings and the sky. The branches in the sky in the original image are very annoying. Let’s remove that too. Look at the picture:
Original picture source: Teacher Li Tao


2
Use filter tools
This step is very important because the original image is very sharp. We use filters to blur it into an anime style. The general operation is as follows:
Select ps FilterMirror – Filter Library – Artistic Effects – Dry Brush
As shown in the figure, the three parameters are:0, 10, 1

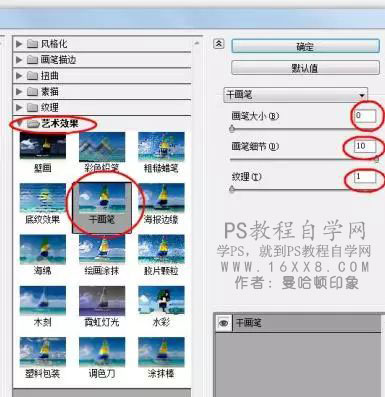
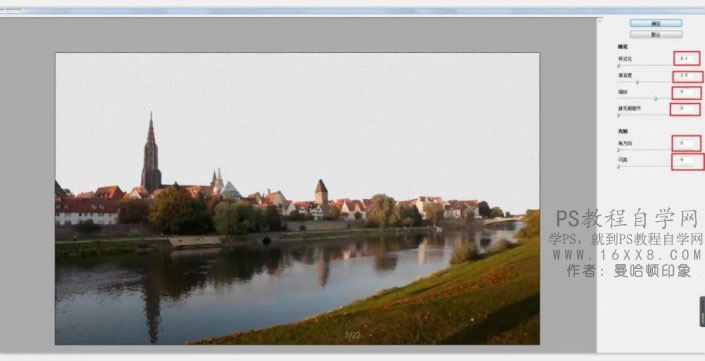
Then select Filter – Oil Painting in PS. As shown in the figure, the six parameters are:0.1, 2.5, 5, 0, 0, 0
(Some PS versions do not have the oil painting filter, the author is using the PS CS6 version)

3
Overall brightening
Observing the original image, I found that the photo was overall dark and there were no details in the dark parts. I entered camera raw to increase the exposure and shadows:
Some places were overexposed, so I pushed back the highlights a bit.
The same white and black are also improved;
Slightly increase the natural saturation to make the overall color of the photo more vivid.

4
Change the sky
Find an animation sky material on the Internet (see the download address at the beginning of the article). The color of the sky should be as close as possible to the building.

Insert the sky material and find that the two do not match. Then brighten the sky to the same brightness as the building.
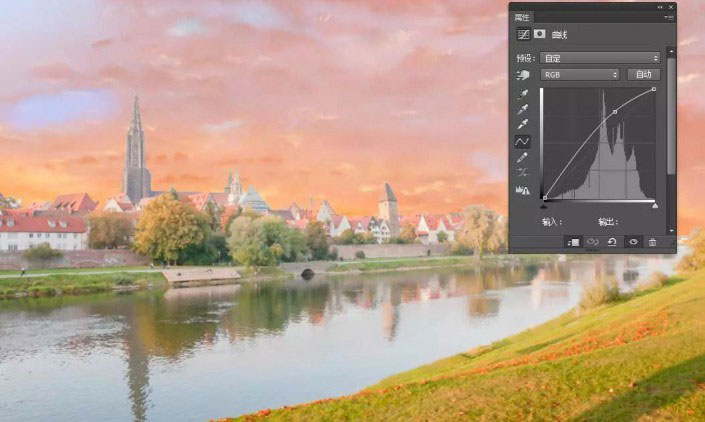
At this time, we found that the general animation style has come out, and now we need to process the colors.
5
Color processing
First of all, the color of the river is too fake, we have to deal with it like the river water in anime – light blue.
Select the selection of the river and create a new transparent layer filled with the color: 56878e

Change the fill color layer opacity to:47%around.
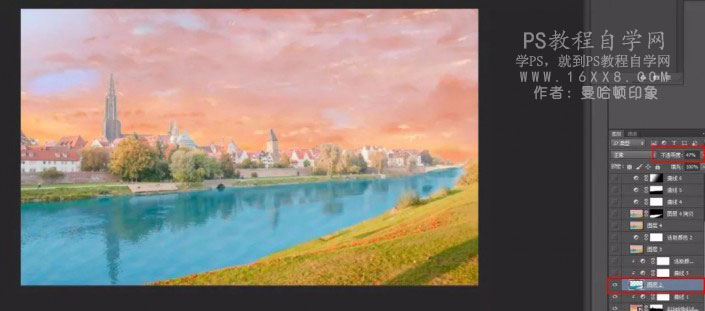
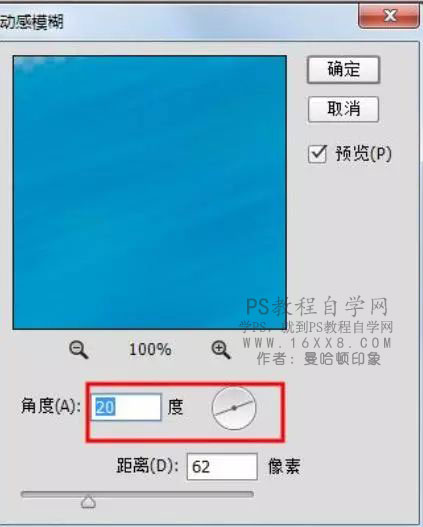
In order to simulate the flowing river water, we need to add motion blur to the layer. Select the river color layer ps selection Filter-Blur-Motion Blur

Change the angle to the angle of the river flow20 degrees:
Effect:
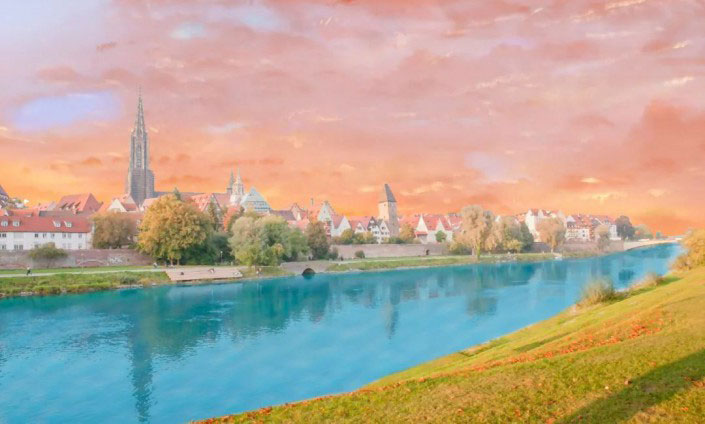
I always feel that the color of the river is very eye-catching in the picture, and the color of the river needs to be processed separately:
Select river layer selectionOptional colors– CyanandBlue The processing is as follows:


Continue to observe and find that the buildings and sky above the water surface are grayish and bright. Use mask alone to darken this area in a curve:

This tutorial has been completed:

www.16xx8.com
The author conducted another exercise using the above-mentioned imitation animation principles, as shown in the figure:
The author said
Summary
Don’t blindly imitate tutorials. Every photo is different, so the parameters cannot be rigidly applied. The most important thing is the principle. Knowing how to use the tools in PS to adjust the photo to the effect we want, in the end, it still boils down to Use of tools. This tutorial by the author is used as a reference. Tutorials will continue to be updated in the future. If you want the author to publish any tutorials, you can leave a message at the bottom. Maybe your tutorial will be published in the next issue. Welcome everyone to likeLike span>Support us.
Remarks: All text in the picture is written by the author (ManHatton Impression) original, case explanation in the picture. Part of the picture comes from the Internet. If there is any infringement, please contact us and it will be deleted.
@Manhattan Impression PHOTO:
Hello, everyone, I am Manhattan Impression. I have explained the principles and applications of histograms to you in the last few issues. This time I will bring you a color grading tutorial in the later stage of imitating animation. Some time ago, because of a friend’s I posted a picture that imitates animation. Everyone wants to know how it was post-produced. There is a high demand for it, so I made this tutorial for everyone to learn from.
The general process of this tutorial is as follows:
1: Determine the material
2: Cutout
3: Filter processing + brightness adjustment
4: Replace the sky brightness with uniformity
5: Color adjustment
First the comparison picture:

www.16xx8.com
Find good materials and get twice the result with half the effort
Of course, doing this kind of animation post-production tutorial does not mean just taking a photo. There are also certain criteria for judging. Generally speaking, the style of the original picture must be somewhat similar to the style of the animation.
1
Cutout
The first step is to cut out the image. Because we need to change the sky, we can see that there is a big color difference between the buildings and the sky in the original image. This is still very convenient for us to separate the buildings and the sky. The branches in the sky in the original image are very annoying. Let’s remove that too. Look at the picture:
Original picture source: Teacher Li Tao


2
Use filter tools
This step is very important because the original image is very sharp. We use filters to blur it into an anime style. The general operation is as follows:
Select ps FilterMirror – Filter Library – Artistic Effects – Dry Brush
As shown in the figure, the three parameters are:0, 10, 1


Then select Filter – Oil Painting in PS. As shown in the figure, the six parameters are:0.1, 2.5, 5, 0, 0, 0
(Some PS versions do not have the oil painting filter, the author is using the PS CS6 version)


3
Overall brightening
Observing the original image, I found that the photo was overall dark and there were no details in the dark parts. I entered camera raw to increase the exposure and shadows:
Some places were overexposed, so I pushed back the highlights a bit.
The same white and black are also improved;
Slightly increase the natural saturation to make the overall color of the photo more vivid.

4
Change the sky
Find an animation sky material on the Internet (see the download address at the beginning of the article). The color of the sky should be as close as possible to the building.


Insert the sky material and find that the two do not match. Then brighten the sky to the same brightness as the building.

At this time, we found that the general animation style has come out, and now we need to process the colors.
5
Color processing
First of all, the color of the river is too fake, we have to deal with it like the river water in anime – light blue.
Select the selection of the river and create a new transparent layer filled with the color: 56878e

Change the fill color layer opacity to:47%around.

In order to simulate the flowing river water, we need to add motion blur to the layer. Select the river color layer ps selection Filter-Blur-Motion Blur

Change the angle to the angle of the river flow20 degrees:

Effect:

I always feel that the color of the river is very eye-catching in the picture, and the color of the river needs to be processed separately:
Select river layer selectionOptional colors– CyanandBlue The processing is as follows:


Continue to observe and find that the buildings and sky above the water surface are grayish and bright. Use mask alone to darken this area in a curve:

This tutorial has been completed:

www.16xx8.com
The author conducted another exercise using the above-mentioned imitation animation principles, as shown in the figure:
The author said
Summary
Don’t blindly imitate tutorials. Every photo is different, so the parameters cannot be rigidly applied. The most important thing is the principle. Knowing how to use the tools in PS to adjust the photo to the effect we want, in the end, it still boils down to Use of tools. This tutorial by the author is used as a reference. Tutorials will continue to be updated in the future. If you want the author to publish any tutorials, you can leave a message at the bottom. Maybe your tutorial will be published in the next issue. Welcome everyone to likeLike span>�Support us.
Remarks: All the text in the picture is original by the author (Manhattan Impression). The case explanation in the picture is partly from the Internet. If there is any infringement, please contact us and it will be deleted.

 微信扫一扫打赏
 支付宝扫一扫打赏

