This tutorial uses PS to create a fresh effect on the characters shot on location. In fact, there are many fresh photos that do not have specific numerical values. Most of them are adjusted based on feeling, personal aesthetics and understanding of color. In the toning, coupled with the secondary composition and typesetting in the later stage, the entire photo is made concrete and packaged. Only when the entire photo has a soul can it have meaning. Only when people see it will they think, oh, this tone I like it and can resonate with it. How can I do it? There is really no definite value. What we want to teach students is to observe, practice, and understand the entire picture from shooting to post-production. The rest must be left to the students to decide and go. Judgment, let’s learn more specifically through tutorials.
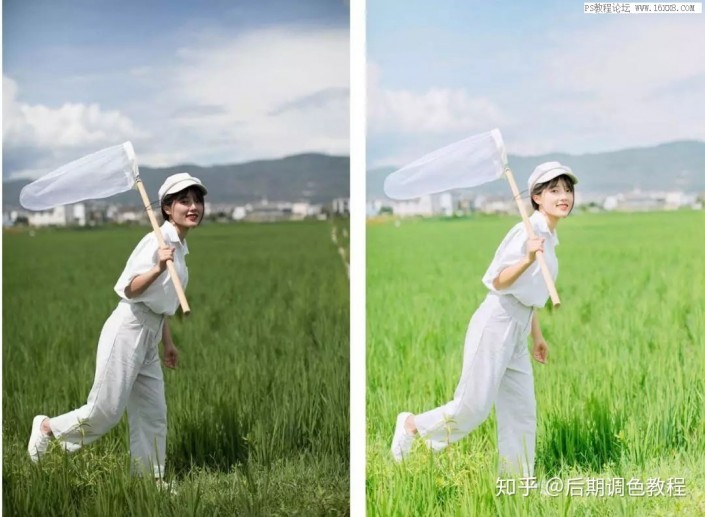
Rendering:

Operation steps:
1. Insufficient overall exposure; 2. Insufficient overall color levels; 3. Insufficient color purity; 4. Insufficient transparency; 5. Uneven lighting on the model’s face;

www.16xx8.com
Color tone adjustment
Import the RAW format original film into LR for tone adjustment. The basic column adjustments are as follows:
◆ White balance adjustment

The color temperature here has been adjusted OK in the camera, which is around 5200, so it only needs a slight adjustment and it will be OK.
◆ Tone bar adjustment

Increase the overall exposure to restore the original film to normal exposure.
Adjust photo contrast through highlights, shadows, white levels, and black levels.
In addition to this, photo contrast can also be adjusted via curves.
◆ Preferences

I generally don’t adjust the clarity and saturation in LR. I just slightly increase the vividness of the algorithm which is different from the clarity and saturation. The details vary from person to person.
◆ Curve adjustment Regarding the curve, many people do not know its principle.
Especially those who are new to photography may find it difficult to operate, but actually it is not that difficult once you understand its principles.
Friends who are more careful will notice that there is a peak like a mountain in the curve. Where does it come from?

The peaks within the curve correspond to the histogram.
Within the curve, the peaks from left to right in the area below the straight line represent shadows, midtones, and highlights, and the X and Y axes from left to right and bottom to top represent the process from dark to light.
Now that we know the principle of curves, let’s take a look at how I adjusted them for this set of photos.
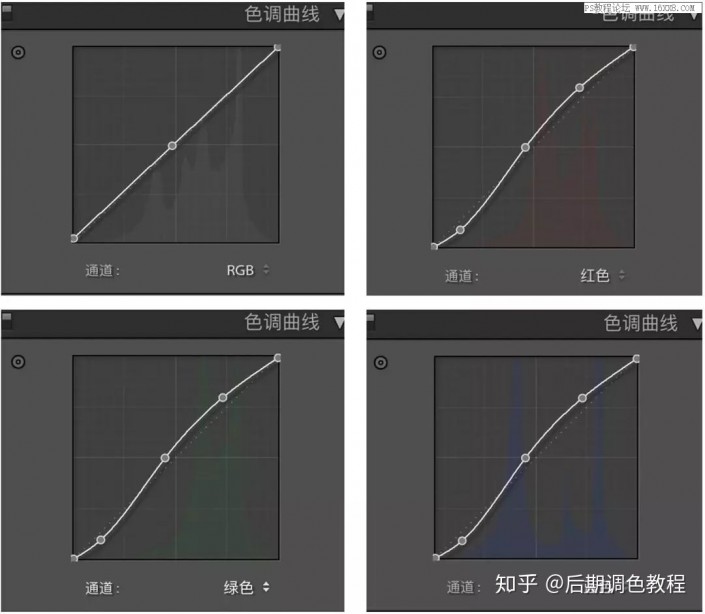
You can see from the above that I only moved the green, red, and yellow curves.
It’s just a curve based on this set of photos, so you can adjust it according to your own feeling. Blindly applying the presets will not give you the desired effect.
◆ HSL adjustment
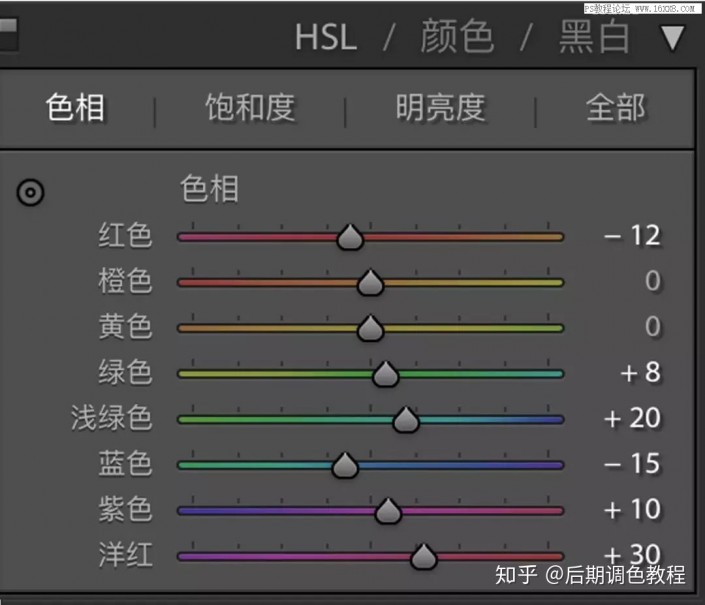


In LR, HSL represents hue, saturation and brightness respectively.
Here you just adjust according to your own photo needs. There are no fixed parameters. The effects of applying parameters when shooting in different scenes and at different times are different.
◆ Split tones
The split tone tool can add the color you want to the highlights and shadows in the photo, and it is very convenient to use.

The Split Toning tool has a total of 5 sliders, which are divided into highlight hue, highlight saturation, balance, shadow hue and shadow saturation from top to bottom.
◆ Lens correction

There are two steps before lens correction, namely sharpening and noise elimination. Generally, I don’t process it here and leave it to PS.
Lens correction can also be placed in the original image in RAW format, and the first step is to process it after importing it into LR. Here you need to selectively process according to the atmosphere of the photo, such as vignetting and so on.
Tip: If there are purple and green edges in the photo, you can click Manual next to them and use a straw to eliminate them.
◆ Camera calibration
Red, green and blue in camera calibration represent the three primary colors. In photography, all colors are composed of three primary colors. It is recommended to try and adjust according to the color needs of your photos.
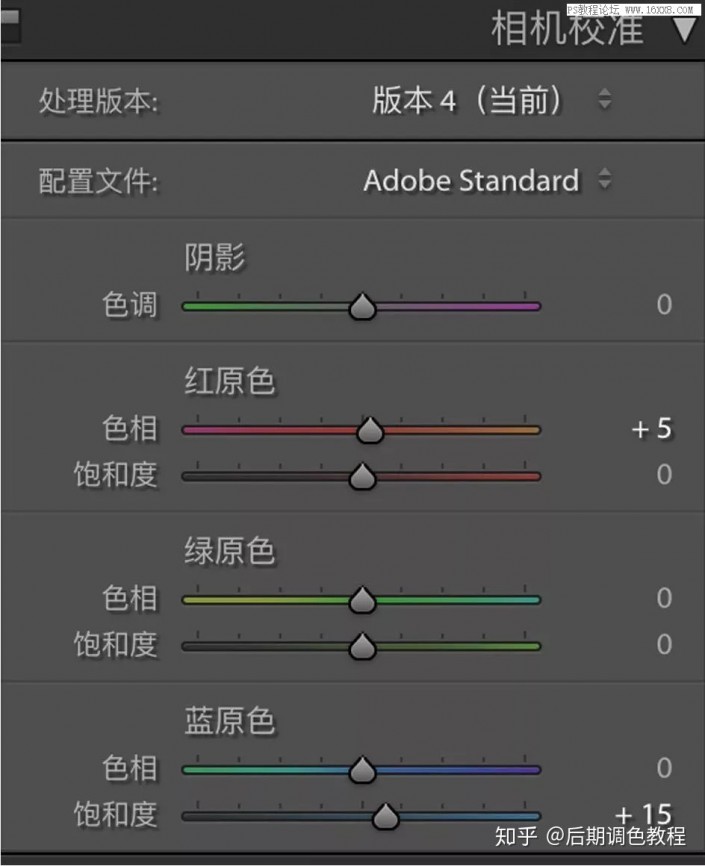
Tip: Increasing the saturation of the blue primary color can increase the overall brightness of the photo. It is recommended to adjust it according to your photo needs.
◆ Whiten teeth

The overall tone of the photos has been determined. In some photos, the model’s teeth look yellow and need to be whitened. Here I recommend using the adjustment brush, which has a special item for teeth whitening.
The principle is to increase the exposure and reduce the saturation. After clicking, you can use the brush to paint on the teeth. My parameters are set to exposure +0.4 and saturation -45.
◆ Partition exposure
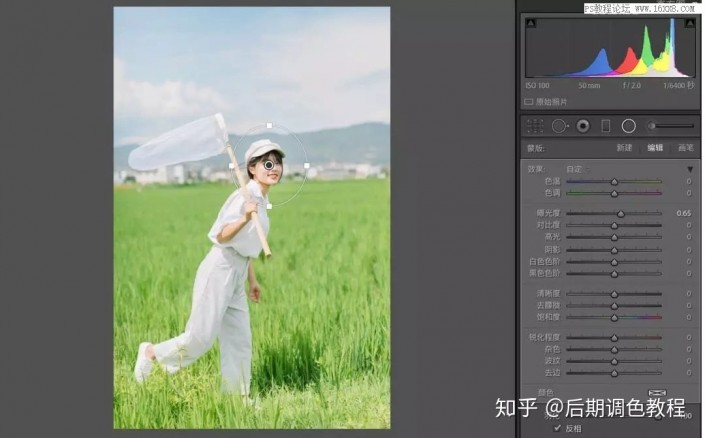
The previous adjustments have brought out the overall color gradation of the photo. When we were analyzing the original film. It is mentioned that the model receives uneven light, so it needs to be dealt with by zonal exposure.
◆PS part
There are no specific operations for the PS part. Each of my PS parts is based on specific photos. Share the following adjustments I made in PS for the rice field group:

This concludes this article sharing the early and late stages of small fresh photography with examples.
I hope this tutorial can give you some inspiration or avoid some detours if you are on the road of photography.
Many students like to ask for presets, but in fact it is useless. The presets belong to others and are only suitable for the parameters of the photo they took, not your photo. Specifically, we have to learn, learn photography, and learn PS. Show the entire work to its best.
This tutorial uses PS to create a fresh effect on the characters shot on location. In fact, there are many fresh photos that do not have specific numerical values. Most of them are adjusted based on feeling, personal aesthetics and understanding of color. In the adjustment, coupled with the secondary composition and typesetting in the later stage, the entire photo is embodied and packaged, and the entire photo has a soul.Only then does it have meaning, and when people see it, they will think, Oh, I like this tone and it can resonate with it. How to do it specifically? There is really no definite value. What we want to teach students is to observe, practice, and understand the entire picture from shooting to post-production. The rest must be left to the students to decide and go. Judgment, let’s learn more specifically through tutorials.
Rendering:

Operation steps:
1. Insufficient overall exposure; 2. Insufficient overall color levels; 3. Insufficient color purity; 4. Insufficient transparency; 5. Uneven lighting on the model’s face;

www.16xx8.com
Color tone adjustment
Import the RAW format original film into LR for tone adjustment. The basic column adjustments are as follows:
◆ White balance adjustment

The color temperature here has been adjusted OK in the camera, which is around 5200, so it only needs a slight adjustment and it will be OK.
◆ Tone bar adjustment

Increase the overall exposure to restore the original film to normal exposure.
Adjust photo contrast through highlights, shadows, white levels, and black levels.
In addition to this, photo contrast can also be adjusted via curves.
◆ Preferences

I generally don’t adjust the clarity and saturation in LR. I just slightly increase the vividness of the algorithm which is different from the clarity and saturation. The details vary from person to person.
◆ Curve adjustment Regarding the curve, many people do not know its principle.
Especially those who are new to photography may find it difficult to operate, but actually it is not that difficult once you understand its principles.
Friends who are more careful will notice that there is a peak like a mountain in the curve. Where does it come from?

The peaks within the curve correspond to the histogram.
Within the curve, the peaks from left to right in the area below the straight line represent shadows, midtones, and highlights, and the X and Y axes from left to right and bottom to top represent the process from dark to light.
Now that we know the principle of curves, let’s take a look at how I adjusted them for this set of photos.

You can see from the above that I only moved the green, red, and yellow curves.
It’s just a curve based on this set of photos, so you can adjust it according to your own feeling. Blindly applying the presets will not give you the desired effect.
◆ HSL adjustment


In LR, HSL represents hue, saturation and brightness respectively.
Here you just adjust according to your own photo needs. There are no fixed parameters. You can apply the parameters when shooting in different scenes and at different times.The effect is different.
◆ Split tones
The split tone tool can add the color you want to the highlights and shadows in the photo, and it is very convenient to use.

The Split Toning tool has a total of 5 sliders, which are divided into highlight hue, highlight saturation, balance, shadow hue and shadow saturation from top to bottom.
◆ Lens correction

There are two steps before lens correction, namely sharpening and noise elimination. Generally, I don’t process it here and leave it to PS.
Lens correction can also be placed in the original image in RAW format, and the first step is to process it after importing it into LR. Here you need to selectively process according to the atmosphere of the photo, such as vignetting and so on.
Tip: If there are purple and green edges in the photo, you can click Manual next to them and use a straw to eliminate them.
◆ Camera calibration
Red, green and blue in camera calibration represent the three primary colors. In photography, all colors are composed of three primary colors. It is recommended to try and adjust according to the color needs of your photos.

Tip: Increasing the saturation of the blue primary color can increase the overall brightness of the photo. It is recommended to adjust it according to your photo needs.
◆ Whiten teeth

The overall tone of the photos has been determined. In some photos, the model’s teeth look yellow and need to be whitened. Here I recommend using the adjustment brush, which has a special item for teeth whitening.
The principle is to increase the exposure and reduce the saturation. After clicking, you can use the brush to paint on the teeth. My parameters are set to exposure +0.4 and saturation -45.
◆ Partition exposure

The previous adjustments have brought out the overall color gradation of the photo. When we were analyzing the original film. It is mentioned that the model receives uneven light, so it needs to be dealt with by zonal exposure.
◆PS part
There are no specific operations for the PS part. Each of my PS parts is based on specific photos. Share the following adjustments I made in PS for the rice field group:

This concludes this article sharing the early and late stages of small fresh photography with examples.
I hope this tutorial can give you some inspiration or avoid some detours if you are on the road of photography.

Many students like to ask for presets, but in fact it is useless. The presets belong to others and are only suitable for the parameters of the photo they took, not your photo. Specifically, we have to learn, learn photography, and learn PS. Show the entire work to its best.

 微信扫一扫打赏
 支付宝扫一扫打赏

